Posting this a bit early. Not a whole lot to report (and I hate that I’ve opened two devlogs in a row like this, but it is what it is).
No videos this month.
Devlog
Summary
- ProdUI version of EditField is bootable and partially complete
- I canned DemoUI. Work continues on ProdUI
- Made QuadSlice, a simple LÖVE library for defining and drawing 9slices
- Investigated options for scalable UIs
- Made AstroSprite, a sprite wrapper library for various LÖVE graphics functions (not yet released)
- Started a skin system for ProdUI widgets
EditField Status
EditField under ProdUI now boots and is partially working. I ended up moving a lot of widget behavior into the EditField state table directly. It’s less customizable as a result, but it made sharing the EditField codebase across two UI systems easier.
DemoUI is Gone
Speaking of that…
I decided to drop DemoUI entirely, and just continue work on ProdUI. The imagined use case for DemoUI was demonstration programs and simple games, but it requires a substantial amount of bootstrapping code in an application compared to other LÖVE UIs like SUIT, and ProdUI can basically be used in a flat (or one-level-deep hierarchical) fashion with modest additional overhead.
The biggest reason for dropping DemoUI is that it’s so similar to ProdUI in terms of file names, variable names, overall structure, etc., yet different, that I was frequently confusing the two in my text editor. It might be worth returning to someday, but right now, it’s just messing with my head.
QuadSlice
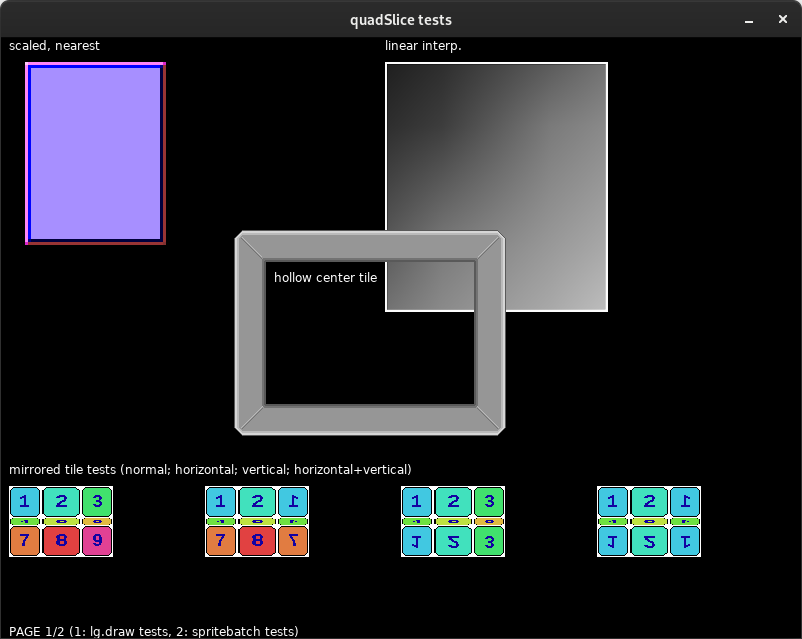
This is a library for defining and drawing 9Slice images: 3×3 mosaics where the middle portions stretch to fill an arbitrary rectangular space while the edge tiles remain fixed. They’re typically used for UI elements like message boxes and buttons.
A QuadSlice definition file contains a sequence of quads representing each of the 9 tiles in the mosaic, and quadSlice.draw() uses love.graphics.draw() internally to draw each quad with a scale that matches the requested width and height. The library also provides utility functions to get the vertices and texture UVs from a def, if the library user wants to render 9slices as LÖVE Meshes instead.
UI Scaling
I toyed with the idea of rasterizing UI spritesheets at run-time using LÖVE’s shape functions and a canvas. This might have some merit, but I imagine that few artists would put up with having to write out function calls to create or modify UI elements, and any vector art package that I could write for this purpose will forever fall short of applications like Inkscape and Adobe Illustrator.
So, I looked at Inkscape again, this time making a spritesheet of basic UI elements as an SVG file. The size for this SVG is 256×256 pixels, and it can be exported at integral scales (512×512, 1024×1024, etc.) without any rounding issues. Quads defined for the 256×256 version can be recreated with the new scaling applied. This seems like an acceptable option.
I learned from this LÖVE DPI-scaling issue ticket that LÖVE Quads can be “pre-magnified” by scaling the arguments provided to love.graphics.newQuad(). For example, if you multiply all arguments by 2 (x, y, width, height, sw, sh), then when the image+quad pair is drawn with default settings and a scale of 1, the resulting image will be twice as large. While not ideal, if no higher resolution art is available, that could be an option for scaling the existing art without fussing with the sx and sy parameters in love.graphics.draw().
Aside: on that note, it appears you can make sx and sy behave like width and height by dividing all arguments to newQuad()by the quad’s width and height:
local qw, qh = 16, 16
local qq = love.graphics.newQuad(8/qw, 8/qh, 16/qw, 16/qh, iw/qw, ih/qh)

-- ...

love.graphics.draw(image, qq, 0, 0, 0, 32, 32) -- draws at 2x
I have concluded that the core ProdUI library can’t handle UI scaling on its own. There are too many things that can vary from application to application, let alone system to system. The most it can do is be amenable to the library user reloading assets and reshaping objects.
AstroSprite
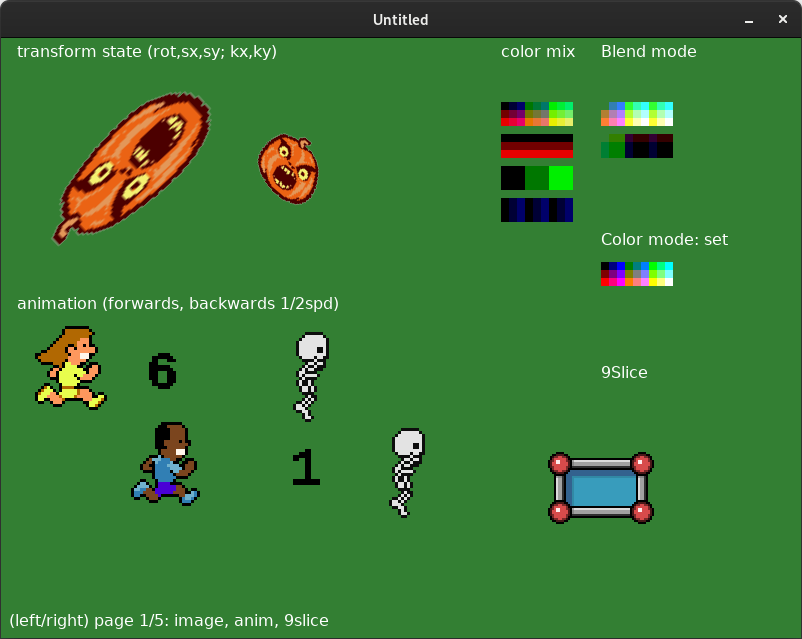
A test of the AstroSprite library.
I wrote this as part of an effort to implement a skinning or theming system in ProdUI. It basically lets the user create sprite tables, with the following types supported:
- image: a LÖVE Image, with or without a Quad
- anim: an animated image
- 9Slice: via QuadSlice
- Wrappers for LÖVE objects: text, sprite_batch, mesh
- Wrappers for LÖVE drawing functions: print(f), rect, circle, ellipse, arc, (poly)line, polygon, points
Additionally, helper functions are provided to store the current LÖVE global color, to mix it with another color (multiplying in the range of 0-1), and to reload it. This would help in situations where you want to dim a disabled widget and all of its children by setting it to half-color.
I imagined that AstroSprite would be the basis for skinning widgets, but so far I haven’t actually used it. Oh well. It was neat to finally play around with love.graphics.arc(), at least. And, it may still come in handy for visual objects with multiple parts, or widgets which need replaceable visual components. I’m holding off on releasing until I have an opportunity to test it.
Skins
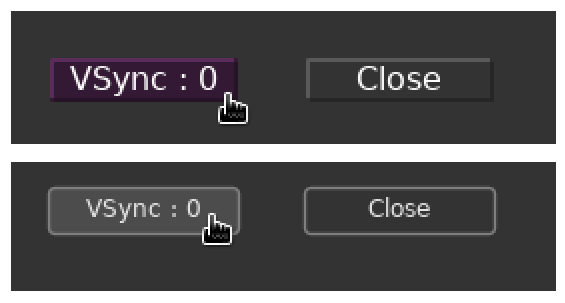
A test of two skins (with different draw functions, fonts, etc.) applied to the same button widgets.
I worked out a basic skinning system for ProdUI. You provide the UI Context with a skin table which contains a hash of tables representing each element of your interface. For example, my_skin.button1 would contain details and functions for one kind of button in your UI. Each widget has a self.skin_t table, which is populated with the result of self.context.skin[self.skin_id]upon widget creation, or recreation of the skin. The per-widget skin state is stored in another table, self.skin_state.
The skin_state can read the widget table, but the widget should not be peering into skin_state (since there are no guarantees that two skins would be compatible), and neither one should be modifying the other except for the widget calling established skin API functions (create, update, destroy, etc.). Using this arrangement, it should be possible to change the skinning system at run-time without trashing the state of widgets or the UI context as a whole.
I have the very basics of two skins working: one that uses 9slices to render buttons, and one which uses love.graphics shapes (both pictured above).
ProdUI will not handle themes directly, but one should be able to load a skin table and then make thematic modifications before applying it to a UI context. The __index metamethod could be used to redirect some field lookups to a separate theme table.
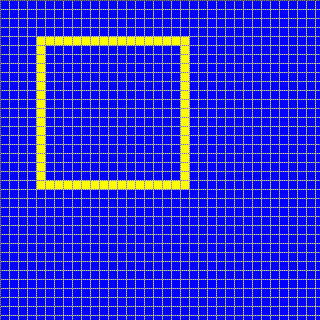
Notes on love.graphics.rectangle()
Here’s something I noticed while working on UI elements drawn with love.graphics objects. Let’s draw a 16×16 yellow square against a blue background, in line mode:
function love.draw()
    love.graphics.push("all")

    love.graphics.clear(0, 0, 1, 1)
    love.graphics.setColor(1, 1, 0, 1)
    love.graphics.rectangle("line", 4, 4, 16, 16)

    love.graphics.pop()
end
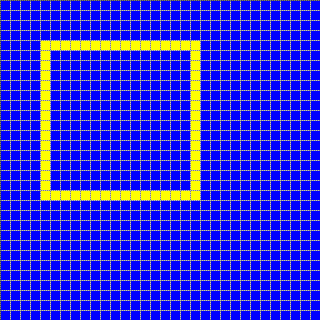
Here is the result, magnified in GraphicsGale:

This is a common beginner issue: the result is a dim square with a width of two pixels. It happens because coordinate x4y4 is treated as the point between pixels x3y3, x4y3, x3y4 and x4y4. To get a sharp, 1-pixel-thick line, we need to draw halfway between the pixel coordinates by adding 0.5 to each axis.
love.graphics.rectangle("line", 4.5, 4.5, 16, 16)
That’s better. But if you look closely, you will find that we have rendered a square of 17×17 pixels, not 16×16. In love.graphics.rectangle(), LÖVE calculates the positions for the right, bottom and bottom-right vertices by adding the offset and length together, which leads to the shape being 1 pixel wider and taller. I assume it is this way for a good reason, maybe related to scaling or the ability to use negative dimensions. In any case, you need to be aware of it if you want outlined rectangles to fit snugly.
We can work around this by subtracting 1 from the width and height:
love.graphics.rectangle("line", 4.5, 4.5, 15, 15)
There we go.
Edit from October: I forgot to mention that this isn’t necessary for standalone rectangles in fill mode: you will just end up with a rectangle that is one pixel row/column shorter. Although, if you are drawing a fill rectangle followed by a line rectangle overlaid on top of it, then applying the offsets to both seems to keep them in sync when moving across sub-pixels. I should really upload an example snippet to illustrate this.
Closing
I’m hoping September will be productive. I should have another devlog post around the 30th, hopefully.
(e: 2022/Oct/16: Update to rectangle notes)