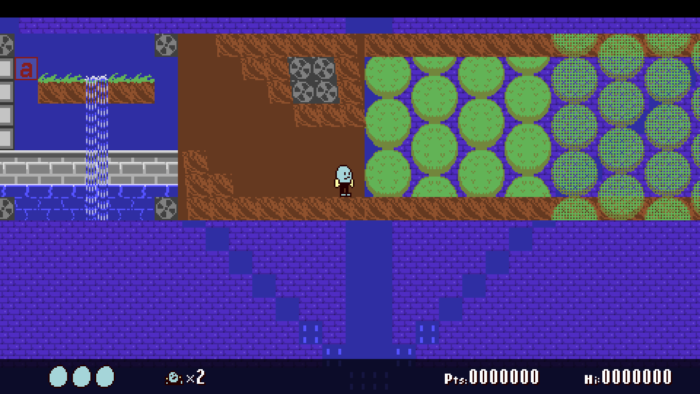
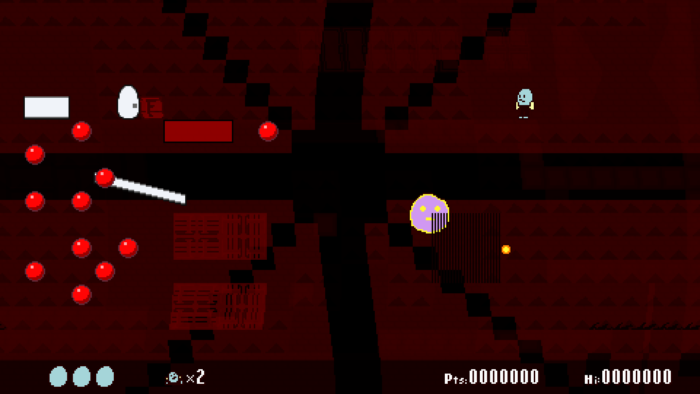
A small test world containing various graphical effects. (Video)
This month, I added LÖVE SpriteBatches, additional blend modes, and a per-scene shader to the graphics module.
Batched drawing of tilemap layers
I’ve wanted to optimize my tilemap drawing for a while, but my tile animation system and the general messiness of the current render function got in the way. I took two steps towards experimenting with this: 1) be OK with replacing the current animation system with something less flexible but more predictable, and 2) get a basic tilemap renderer running in a separate project, and mess with that instead of the one in the main codebase.
The way Bolero rendered tilemaps before this was to call love.graphics.draw() for every in-view, non-empty tile. Moving forward, I had two options: render tiles to mini-canvasses and render those canvasses to the main canvas, or pack the tile draws into a SpriteBatch and then render that. As the canvas method would require more setup work and use a lot more graphics memory, I started with batching.
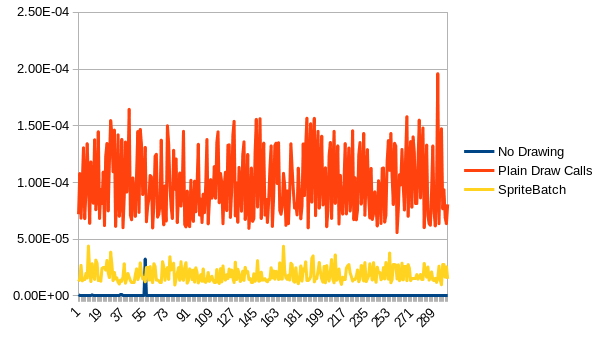
Initial tests looked really good. In this chart, the highest time for drawing a batch is lower than the best time for plain draw calls:
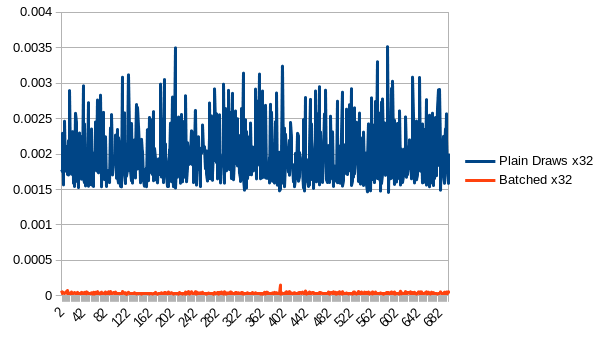
The results are more dramatic when drawing the same map layer 32 times to simulate more on-screen rooms and background / foreground layers:
I should note that recent versions of LOVE already auto-batch consecutive calls to love.graphics.draw() if they reference the same texture. On my main workstation, manually clearing and re-adding all tiles to the batch on every frame results in similar performance as plain draw calls, as does manually updating every batch index without clearing and re-adding.
Anyways, LOVE has no problem at all drawing a batched version of a 256×256 map without any kind of culling on the callback side, but drops to a single-digit framerate when attempting to do the same using plain draw calls without culling:
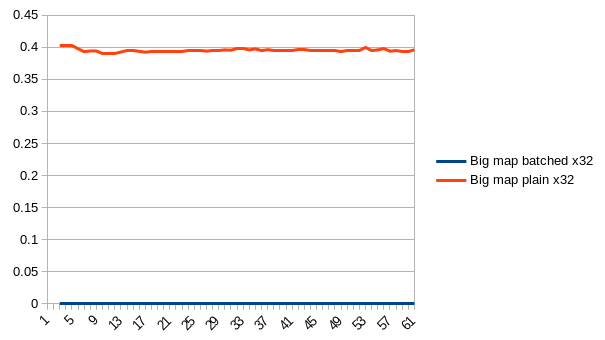
Conclusion: Hop on board the SpriteBatch train ASAP, at least for rendering tilemaps.
Initial results from implementing batching in the main project also looked really good. I created some static batches for every room tilemap layer, and the FPS went up from 430 to 565. (Granted, at this point, it was missing several features which add more overhead, but I was definitely 100% sold on using batches instead of one-draw-call-per-tile.)
Tile Animation Rewrite (Again)
I made some adjustments to the tile animation system back in March, mainly to take advantage of Tiled’s built in animation editor. At the time, I mentioned that chunked map rendering would require further redesign, and, well, here we are. The existing system was pretty flexible, supporting wacky features like arbitrary playback rates on a per-tileDef basis, ‘ping ponging’ backwards and forwards, and offsetting the frame update interval so that the tile updates “wipe” across the screen, or display a different frame depending on the X and/or Y tile coordinate.
While you could do some pretty fun stuff with all of this, it was only possible because the map renderer applied a frame selection algorithm to every visible animated tile, just before they got rendered with love.graphics.draw(), every time. To be clear, this isn’t necessarily a bad way to do it, but it does contribute some overhead that I’m trying to avoid in moving to semi-static sprite batches, especially when there are many map layers on-screen.
I want flexibility, but I don’t want to end up in situations where the batches are mass-updated all at once in a single frame, causing uneven CPU/GPU usage. I thought this over for a while and ultimately decided to limit the maximum number of animation frames per tile to 4, and to force all animated tiles in a layer to play back at the same speed. With those rules in place, I can make up to four whole SpriteBatches per map layer, each representing the map in one of its four possible animation states. Then, just swap the currently displayed SpriteBatch based on the timing of the scene.

Rest in peace, ten-frame glass window and door tiles.
This won’t scale well with very large rooms: SpriteBatches have to be stored in memory somewhere, and when a map is updated, we have to update up to four separate SpriteBatches at the same coordinate. But not every layer has to be animated, not every room needs to have the full background / stage / foreground set of visible layers, and not every room needs to be large to begin with (that’s why rooms exist in the first place: to divide large environments into smaller more manageable chunks.) Once the room is set up, the actual tile animation incurs very little overhead.
(Auto) Batching of Actor Sprites
As mentioned above, more recent versions of LOVE automatically batch together draw calls that use the same texture. I did the bare minimum to make some actor spritebatches and populate + draw them instead of doing plain draw calls. Results are actually in the favour of auto-batching, albeit by a very small margin. Unlike tilemaps, I have to clear and re-add all sprites to the batch for actors because they have the potential to move anywhere at any time. I’m actually a bit relieved by this result, because it means I don’t have to rewrite transform calls to get the batched version fully up to par. I didn’t think there would be a huge difference, but it’s always good to check.
t.gammacorrect
LOVE has a gamma-correct mode which offers better-looking blended colors at the cost of some overhead. This isn’t something you can change at runtime, and blends look pretty different in either mode. I left it enabled for a while, but then disabled it again after finding that it interfered with a fragment shader I was working on. To be honest, my current monitor’s colors are pretty bad, so I probably shouldn’t even worry about it right now.
BlendMode
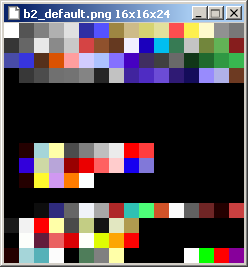
I added support for selecting a blend mode on a per-sprite and per-tilemap basis. LOVE has several blend modes, though most of them require the premultiplied alpha mode to work correctly (in some cases, they throw a fatal error if premultiplied is not active.) I added four blend options to sprites and tilemaps that work with multiplyalpha mode: alpha (the default), replace, add and subtract. Here is a pic of them applied to a ghost sprite from Hibernator:
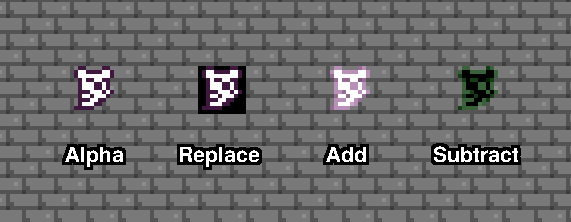
I’ll pretty much need assets designed specifically for these modes, but even so, they’re nice to have easy access to.
Shaders
Tilemap deformation tests using a vertex shader.
To my narrow mind, these are the last big graphical pieces that are missing. Prior to this month I had close to zero experience doing anything with shaders. I dabbled a tiny bit back in 2019, but that was just to make sure that I understood how to load and run a “hello world” style program, and to verify that they actually worked on my PC. I still don’t really know what I’m doing, but with some patience and reading the docs / wiki / forums, I managed to slap together a few effects which will help liven up scenes.
LOVE supports two kinds of shaders, and lets you mix-and-match them when calling setShader: vertex shaders, which modify vertices provided in the draw call, and fragment shaders, which modify pixel color values. I found fragment shaders easier to start with.
Wobble and Mirage

These effects are implemented as vertex shaders, and they mimic the per-line scrolling effects of old consoles, except that they operate on a per-tile-row basis instead of per-pixel-line. Wobble moves a tilemap’s vertices left and right, offset in a sine wave pattern based on their Y coordinate relative to the tilemap’s top-left point. Mirage does basically the same thing, but with the vertices moving up and down instead of sideways. Using either/or looks decent, as long as the frequency and amplitude parameters aren’t too extreme, but activating both at once causes little seams in the tilemap to appear.
Pixel Dissolve

Some mock-ups for various dissolve patterns. Pixels would be activated going from darker to lighter values.
One of the first things I did with fragment shaders was to make a static dithered transparency mask. I wanted to expand this into a grainy animated “dissolve” effect, but I didn’t really know where to start with implementing multiple frames. Later on I returned to this and ended up creating a series of pixel masks within an ArrayImage uniform.
The actual pattern data begins life as a set of ImageData arrays, which are filled in with love.image.setPixel() using some nested for loops. The ImageData objects are organized into one table and converted to the ArrayImage. The ArrayImage is then sent to the shader during game startup. Additional tables keep track of the starting indexes and number of frames for a given dissolve effect. When drawing an entity with a dissolve pattern active, the pattern is sampled and the output pixel’s alpha is multiplied by one minus the dissolve pixel alpha.
I picked the ArrayImage type so that I didn’t have to send a lot of different textures over, and also because it enforces a static size for all patterns. I settled on a size of 8×8, which results in 64 frames for the pixel-by-pixel checkerboard dissolve. Not all hardware supports ArrayImages, but I think I should be OK for the majority of desktop platforms in use these days.
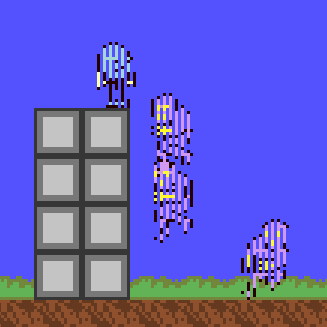
Some actor sprites mid-dissolve.
Palettized Drawing
I banged my head against a wall on this for a while. I understood the part about substituting one color for another within a fragment shader, but actually getting it into the game in a useful form required changes to the graphics module, tilesets, sprites, and asset loading / management system. Since I had a lot of existing artwork drawn in plain RGB, I started by looking for a way to let this art co-exist with palettized art. I planned on hijacking the alpha channel, so that an alpha of 0 is fully transparent, an alpha of 255 is fully opaque, and any value from 1 to 254 is opaque with the value serving as an index into an interchangeable palette. I eventually gave up on this and decided to go 100% all-in on 256-color indexed palettes for tilemaps and actor sprites. Then, later, I realized that my implementation interferes with drawing stuff like line and rectangle shapes, and that there are GUI elements that should always be visible regardless of the current palette settings, so I added an option to disable palette substitution as a per-sprite, per-tilemap feature, and also an option to disable it scene-wide.
When LOVE reads an indexed PNG file, the data gets converted to non-indexed RGB. (Even if LOVE did preserve the palette info, it’s difficult to edit indexed palettes in the art program that I use, and changing the color depth destroys the order of colors anyways.) To create a color index, I’m reserving the top-left 16×16 pixel region in all tilesets and spritesheets as a “translation” palette. While the image is being initialized, the setup function generates a palette table based on the colors in this region, discarding duplicate colors along the way. Then it scans the whole image, replacing matching pixel colors with an index representing the color in its 8-bit red channel. Any colors not present in the 16×16 palette region are discarded as transparent black (zero RGB, zero alpha) and a warning message is logged.
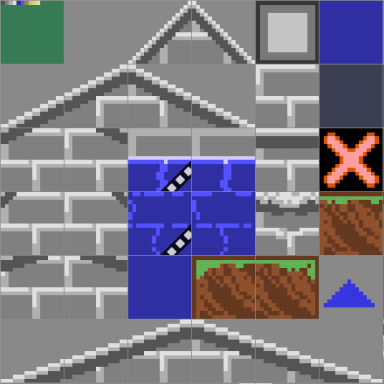
A tileset with a work-in-progress 16×16 RGB-to-indexed translation palette in the upper-left corner.
In this screenshot, tilemap graphics have been successfully indexed to the red channel, but the shader to display the correct values is not yet implemented.
So that’s one part of it. The next concern is: how many palettes are going to be managed at run-time, and how large should they be? In order to keep things manageable for myself, I decided to go with one ‘live’ 256-color palette per scene context, and a library of palette definitions to use as color sources. Spritesheets and tilesets can contain up to 256 index values, though I plan to follow a convention of limiting actor colors to 16 or less and tilemap colors to about 64 or less. When drawing a sprite or tilemap layer, an offset is passed to the shader to select different ranges of the 256-color palette to use, wrapping back to 0 after passing 255. In the shader, index 0 always gets zero alpha so that it can serve as transparency, no matter what palette offset is being used.
I wasn’t sure about how to pass the palette to the scene shader in a way that colors could be easily updated. After reading this post on LOVE’s support forum, I made a canvas to store all live palette colors, and passed it to the scene shader as a uniform texture. To go with this on the main project side, there are tables of colors which represent the current live palettes, and these ultimately inform what the palette canvas is supposed to look like. To change a color, a function is used which modifies the color table on the project / CPU side, and which also sets a ‘changed’ flag which is paired to the index. During love.draw(), a function checks every live paletteInstance for ‘changed’ flags, and pushes those new colors over with calls to love.graphics.points().
There’s one more issue to deal with: as a side effect of OpenGL, if you toggle full-screen mode in LOVE, the contents of canvasses are lost and you have to recreate them. When this happens, I’m setting the ‘changed’ flag for every index in every live palette to true, and then they all get resent to the canvas as single pixels later on in love.draw().
My current default palette, which is what the ‘translation palettes’ map to.
Earlier in this post, I mentioned that I enabled and then disabled gamma-correct rendering, and the indexed palette drawing is the reason why. When gammacorrect is true, the red channel value is corrected, which causes the indexing to retrieve the wrong color from the palette canvas. I tried to undo the correction with the LOVE shader function unGammaCorrectColor(), but even with this in place, some of the first entries in the palette are still wrong, and I’m not sure why. Maybe an off-by-one error somewhere? I guess I could switch the index data from red to the alpha channel, as alpha is always linear and never gamma-corrected, but I kind of want to experiment with alpha values embedded within tiles now, so, I dunno.
Here is a simple example of a color cycle or ramping effect that can be done with the indexed color shader. On the left side is the tile as it is found in the tileset, with translation palette colors. On the right side is the tile as it looks in-engine, with the ‘live’ colors applied and altered over time.

Yeah, yeah, this isn’t all that impressive. A better use of it would be to animate flowing water without having to string a bunch of unique tiles together in an animation. It’d also be good for conveyor belts, and ropes / pulley details in the background. While palette cycling certainly complicates the process of making new art, it’s an additional tool that can be applied alongside regular tile animation and other effects.
ImageData for ImageFonts
I upgraded the project’s method of creating outlines and shadows for fonts. Before, when text was supposed to be outlined, it drew the text four times as black, and then once more with the target color:

This will get the job done 90% of the time for small amounts of text, though the outline may look weird when fading text in or out:
I recently had to deal with modifying ImageData a lot while working on the palette and shader stuff, so I revisited my previous failed attempt at doing outlines by modifying ImageData pixels.
LOVE ImageFonts are created in a special format where each glyph is arranged in a wide strip, left to right, and separated by a spacing color. You can create an ImageFont from an image file directly, or you can load an image file as an ImageData object, modify it with ImageData:getPixel() and ImageData:setPixel(), and then pass it to love.graphics.newImageFont().
Some of my ImageFonts need to support the indexed color system that I added this month, while others don’t need to. For the ones that do, the upper-left 16×16 pixel area is reserved for a translation palette, similar to spritesheets and tilesets (though it’s allowed to be less than 16 pixels, as many of my fonts are shorter than that.) This conflicts with the ImageFont format, which requires the top-left pixel to be the color used for spacing between glyphs. To accommodate this, first the translation palette is processed, with colors converted over to indexed values in the red channel. Then the entire translation palette area is replaced with the spacing color before the ImageData is sent to newImageFont().
The outlining function I have right now requires that all glyphs in the font have enough transparent pixels around them to hold the outline. If the glyph is flush against the spacing column, then this function isn’t smart enough to expand the ImageData to make room. To counter the additional space I had to add between glyphs, there is a parameter in newImageFont() called extraspacing which can accept a negative number (in this case -1).
Overall I need some better tools for manipulating ImageData. This is kind of convoluted right now, but I think it’s a step in the right direction.
Project Outlook
I underestimated the amount of work this stuff would require, especially the indexed palette stuff. There are a lot of different ways that one could implement the indexing, and there are a lot of benefits and drawbacks to weigh. You’re no longer just managing art, but also specific color shades, and how they slot into the live palette. It’s been good to learn about GLSL in any case, and some bugs notwithstanding, I think the project’s graphical side is in pretty good shape now.
Oh no, I’ve been working on Bolero 2 for about a year now. I still have a long way to go before it’s complete. I’ll just have to keep pushing forward: eventually there won’t be anything more to add. Right…?
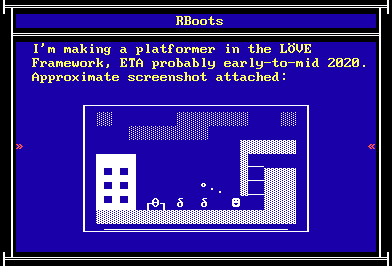
early-to-mid 2020 -> When It’s Done
Stats
Like I mentioned in the last post, I’ve been keeping track of some stats day-to-day. These don’t mean much on their own, but might be fun to look back on.
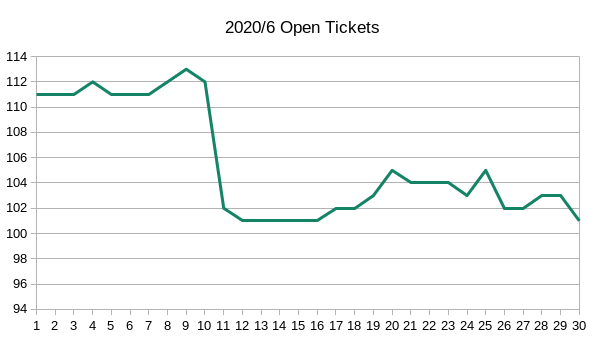
Issues in the codebase which need fixing or followup:
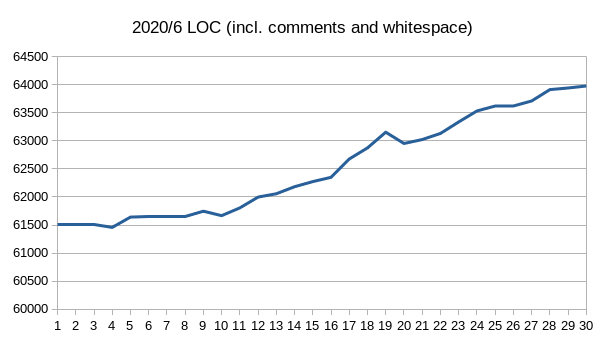
Project lines of code. This is a line-count of .lua, .glsl, .py and .sh files, including comments and whitespace (and things that aren’t really core code, like dozens and dozens of boring ‘animation definition’ tables.)
OK, that’s all I’ve got for now. I’ll post again around the end of July.